Nginx is known for its speed and reliability as an open-source web server. It is popular for its low memory requirements, high scalability, easy configuration, and support for many protocols.
The Hypertext Transport Protocol is where HTTP/2 recently originated from. The latter is used on the Web to deliver pages from server to browser. HTTP/2 is HTTP’s first major update in almost twenty years. HTTP 1.1 was introduced to the public at the end of the 20th century, when webpages were just one long HTML file with an inline CSS stylesheet. Following that, the internet underwent significant transformation, and we are now confronted with the restrictions of HTTP 1.1. Because of how it downloads portions of a page in a queue (the download of the next section may only begin after the previous one has been completed), it reduces the achievable transfer rates for most current websites; on average, each modern web page requires roughly 100 requests to download (each request is a picture, JS file, CSS file, etc).
Why HTTP/2 :
HTTP/2 brings a solution to this problem through some basic changes:
- The download of requests is done in parallel rather than in a queue.
- HTTP headers are compressed.
- The transfer of pages is not done as a text file, but rather as a binary for better results.
- Servers can “push” data even without the user’s request, which improves speed for users with high latency.
- Data can be “pushed” by servers regardless of the user’s demand, and this is helpful to high-latency users, which provides them with more speed.
Regardless of the fact that HTTP/2 requires no encryption, the developers of Google Chrome and Mozilla Firefox, the internet’s most used browsers, stated that they will support HTTP/2 only for HTTPS connections for security reasons. This being said, you will also need to secure them with HTTPS if you decide to use HTTP/2 support to set up servers.
We provide you with this guide that will help you use HTTP/2 support to create a fast and secure Nginx server.
Prerequisites
First thing, before starting, these things are essential:
- Set up one Ubuntu 18.04 server.
- Install Nginx on your server.
- Configure a domain name to point to your server. You can register cheap domain names here.
- Configure a TLS/SSL certificate for your server. There are three possibilities:
- Getting a free certificate from Let’s Encrypt
- Generating and configuring a self-signed certificate
- Buying it from another provider and configuring Nginx to use it
- Configure Nginx to redirect traffic from port 80 to port 443, which is covered by the prerequisites beforehand.
- Configure Nginx to use a 2048-bit or a stronger Ephemeral Diffie-Hellman (DHE) key, which should also be in the previous prerequisites.
Step 1 — Activating HTTP/2 Support
First, your domain should already have a server block at /etc/nginx/sites-available/your_domain with the server_name directive appropriately set. The first change to be made will be allowing your domain’s server block to use HTTP/2 by modifying it.
Launch your domain’s configuration file:
$ sudo nano /etc/nginx/sites-available/your_domainLocate the listen variables related to port 443 in the file:
...
    listen [::]:443 ssl ipv6only=on;
    listen 443 ssl;
...
The first variable belongs to IPv6 connections, and the second one is for all IPv4 connections. HTTP/2 is to be enabled for both.
Each listen directive should be modified to include http2:
...
    listen [::]:443 ssl http2 ipv6only=on;
    listen 443 ssl http2;
...
This asks for the use of HTTP/2 from Nginx with supported browsers.
Edit the text editor after saving the configuration file.
Every time changes are made to Nginx configuration files, make sure you also pay attention to syntax errors in the configuration, through:
$ sudo nginx -tThe following output will appear if the syntax is error-free:
Output:
nginx: the configuration file /etc/nginx/nginx.conf syntax is ok
nginx: configuration file /etc/nginx/nginx.conf test is successful
After that, our server has to be configured to allow the use of a more defined ciphers’ list.
Step 2 — Removing Old and Insecure Cipher Suites
There is a blacklist of old and insecure ciphers in HTTP/2 that must be avoided. Cipher suites are cryptographic algorithms describing the way that transferred data must be encrypted.
The method you’re supposed to use to define the ciphers is dependent on your chosen configuration of your Nginx TLS/SSL certificates.
If you obtained your certificates through Certbot, then the file /etc/letsencrypt/options-ssl-nginx.conf was created and contains ciphers that aren’t powerful enough for HTTP/2. Unfortunately, it would prevent Certbot from applying updates in the future if this file is modified. In this case, we’ll tell Nginx not to use this file while specifying our own list of ciphers.
Launch your domain’s server block configuration file:
sudo nano /etc/nginx/sites-available/your_domainIdentify the line that has the options-ssl-nginx.conf file and comment it out:
# include /etc/letsencrypt/options-ssl-nginx.conf; # managed by Certbot
Add the following line underneath that one in order to define the ciphers allowed:
ssl_ciphers EECDH+CHACHA20:EECDH+AES128:RSA+AES128:EECDH+AES256:RSA+AES256:EECDH+3DES:RSA+3DES:!MD5;
Exit the editor after saving the file.
In your text editor, go ahead and open the file /etc/nginx/snippets/ssl-params.conf if you used self-signed certificates or a third party’s certificate and had it configured based on the prerequisites:
$ sudo nano /etc/nginx/snippets/ssl-params.confFind this line:
...
ssl_ciphers ECDHE-RSA-AES256-GCM-SHA512:DHE-RSA-AES256-GCM-SHA512:ECDHE-RSA-AES256-GCM-SHA384:DHE-RSA-AES256-GCM-SHA384:ECDHE-RSA-AES256-SHA384;
Edit it to look like this:
...
ssl_ciphers EECDH+CHACHA20:EECDH+AES128:RSA+AES128:EECDH+AES256:RSA+AES256:EECDH+3DES:RSA+3DES:!MD5;
Exit the editor after saving the file.
Make sure, this time too, that you check for syntax errors in the configuration:
$ sudo nginx -tIf you identify an error, address it, then test again.
Restart Nginx once there are no more syntax errors
$ sudo systemctl restart nginxRestart Nginx once there are no more syntax errors
Step 3 — Verifying that HTTP/2 is Activated
We should verify that the server is running and can work with HTTP/2.
Make a request to your site by using the curl command and view the headers:
$ curl -I -L https://your_domainThe following output will appear:
Output:
HTTP/1.1 301 Moved Permanently
Server: nginx/1.14.0 (Ubuntu)
Date: Fri, 06 Jul 2018 19:07:12 GMT
Content-Type: text/html
Content-Length: 194
Connection: keep-alive
Location: https://your_domain/
HTTP/2 200
server: nginx/1.14.0 (Ubuntu)
date: Fri, 06 Jul 2018 19:07:12 GMT
content-type: text/html
content-length: 16
last-modified: Fri, 06 Jul 2018 16:55:37 GMT
etag: "5b3f9f09-10"
accept-ranges: bytes
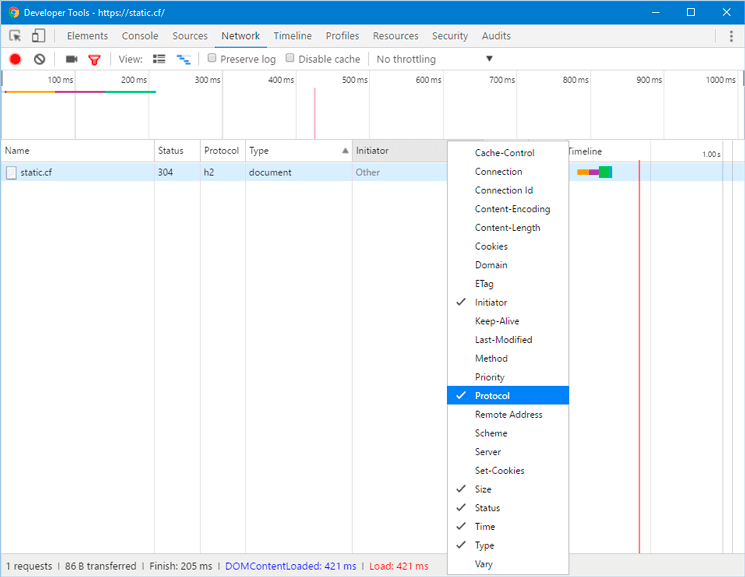
It is also possible to verify that HTTP/2 is running in Google Chrome. Launch Chrome and go to http://your_domain. Open the Chrome Developer Tools (View ⇒ Developer ⇒ Developer Tools), then reload the page (View ⇒ Reload This Page). Go to the Network tab, right-click on the table header row starting with “name”, then select the Protocol option from the pop-up menu.
You will see h2 (referring to HTTP/2) in a new Protocol column, which indicates that HTTP/2 is operational.
You’re ready to serve content using the HTTP/2 protocol by now. Let’s move on to increasing security and performance by enabling HSTS.
Step 4 — Enabling HTTP Strict Transport Security (HSTS)
You can enable HTTP Strict Transport Security (HSTS) to avoid having to do redirects to HTTPS even if your HTTP requests include it. If the browser identifies an HSTS header, it will not attempt to connect to the server via regular HTTP again for a while. No matter what, it will use an encrypted HTTPS connection only to exchange data. This header also protects us from Downgrade attacks.
In your editor, go ahead and launch the Nginx configuration file:
sudo nano /etc/nginx/nginx.confAdd this line to the file in order to activate HSTS:
http {
...
    ##
    # Virtual Host Configs
    ##
    include /etc/nginx/conf.d/*.conf;
    include /etc/nginx/sites-enabled/*;
    add_header Strict-Transport-Security "max-age=15768000" always;
}
...
The max-age is set in seconds. The value 15768000 is equivalent to 6 months.
This header is not added to subdomain requests by default. If you have subdomains and want them applied by HSTS, then add the includeSubDomains variable at the end of the line like this:
add_header Strict-Transport-Security "max-age=15768000; includeSubDomains" always;
Exit the editor after saving the file.
Check for syntax errors in the configuration this time too:
$ sudo nginx -tFinally, to apply the changes, go ahead and restart the Nginx server
$ sudo systemctl restart nginxConclusion
Your Nginx server is now serving HTTP/2 pages. Run a test against your server if you want to test your SSL connection’s strength.