Introduction
Although many users require a database management system like MySQL’s functionality, they might not feel at ease interacting with the system only through the MySQL command line client.
To enable user interaction with MySQL via a web interface, PhpMyAdmin was developed. We’ll go over installing and securing PhpMyAdmin in this guide, so you can use it to manage your databases on an Ubuntu system without risk.
Basic requirements
- Ubuntu server with a non-root administrative user with sudo privileges.
- LAMP stack installed on your server. You can follow this guide on installing a LAMP stack to set this up.
Finally, while utilizing software like PhpMyAdmin, there are essential security issues to be aware of because it:
- Communicates with your MySQL installation directly.
- Handles MySQL authentication.
- Executes and returns the results of any SQL query.
For these reasons, as well as the fact that PhpMyAdmin is a widely deployed PHP application that is routinely targeted for attack, you should never execute it on remote computers through a plain HTTP connection. If you do not already have a domain established with an SSL/TLS certificate, you may use this method to create one, securing Apache with Let’s Encrypt on Ubuntu.
Once you’ve completed these steps, you’re prepared to start this guide.
Step 1: PhpMyAdmin Installation
To begin, we will install PhpMyAdmin from the distro default repository.
$ sudo apt update$ sudo apt install phpmyadmin php-mbstring php-zip php-gd php-json php-curlOn Ubuntu, When requested, you should choose apache2.
The installation procedure places the phpMyAdmin Apache configuration file in the /etc/apache2/conf-enabled/ directory, where it is immediately read. To finish setting Apache and PHP to interact with phpMyAdmin, the next task in this section of this guide is to explicitly activate the mbstring PHP extension, which you can achieve by typing:
$ sudo phpenmod mbstringRestart Apache:
$ sudo systemctl restart apache2With that, our phpMyAdmin installation is complete. In your web browser, navigate to your server’s domain name or public IP address followed by /phpMyAdmin:
http://server_IP/phpMyAdmin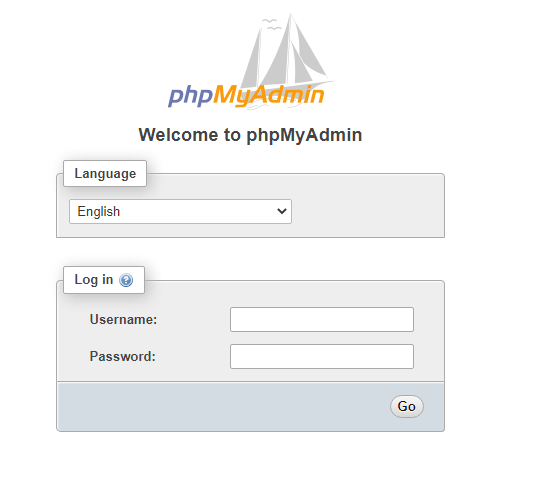
Log in to the interface as root or using another username and password.
Step 2: Secure your phpMyAdmin Instance
At this point, the phpMyAdmin instance installed on our server should be fully functional. We have, however, exposed our MySQL system to the outside world by adding a web interface.
Changing the Application’s Access URL
$ sudo nano /etc/apache2/conf-available/phpmyadmin.confToward the top of the file, you will see two lines that look like this:
Alias /phpMyAdmin /usr/share/phpMyAdmin
Alias /phpmyadmin /usr/share/phpMyAdmin
These two lines are our aliases, which means that whenever we access our site’s domain name or IP address, followed by either /phpMyAdmin or /phpmyadmin, we will be sent the content at /usr/share/phpMyAdmin.
To apply our desired modifications, we should delete or comment out the existing lines and replace them with our own:
# Alias /phpMyAdmin /usr/share/phpMyAdmin
# Alias /phpmyadmin /usr/share/phpMyAdmin
Alias /secretpage /usr/share/phpMyAdmin
To implement the changes, restart the web service:
$ sudo systemctl restart apache2If you go back to the former location of your phpMyAdmin installation, you will get the 404 error.
Your phpMyAdmin interface, on the other hand, will be available at the new site we chose:
http://server_IP/secretpageSetting up an Authentication to the Web Server :
The next feature we want for our installation was an authentication prompt that a user would have to pass before they could access the phpMyAdmin login screen.
Open your config file and add AllowOverride All in <Directory /usr/share/phpmyadmin>
Ubuntu : /etc/apache2/conf-available/phpmyadmin.conf
<Directory /usr/share/phpmyadmin>
    Options SymLinksIfOwnerMatch
    DirectoryIndex index.php
    AllowOverride All
    . . .
And Restart Apache
Now that you’ve enabled the use of.htaccess files for your application, you’ll need to make one to create security rules in place.
Create the file in PhpMyAdmin folder:
$ sudo nano /usr/share/phpmyadmin/.htaccessAdd the following lines:
AuthType Basic
AuthName "Restricted Files"
AuthUserFile /etc/phpmyadmin/.htpasswd
Require valid-user
Save and close the file when you’re finished.
You chose /etc/phpmyadmin/.htpasswd as the location for your password file. You can now use the htpasswd software to create this file and assign it an initial user:
$ sudo htpasswd -c /etc/phpmyadmin/.htpasswd usernamethen enter and confirm a password for the user you are creating.
If you wish to add another user, use the following syntax without the -c flag:
$ sudo htpasswd /etc/phpmyadmin/.htpasswd newuserThen restart Apache to enable .htaccess authentication.
When you enter your phpMyAdmin subdirectory, you will be prompted for the newly established account name and password:
http://server_IP/secretpage

Conclusion
PhpMyAdmin should now be installed and ready to use on your server. You may use this interface to create databases, users, and tables, as well as execute standard operations such as deleting and altering structures and data.