
Apache is the most popular web server and most widely used web server in the world. It provides many powerful features including dynamically loadable modules, robust media support, and extensive integration with other popular software. In this guide, we will demonstrate how to setup a password authentication on an Apache web server configured on Ubuntu 18.04/20.04/22.04 LTS.
Requirements
Before you begin this guide, you’ll need the following:
- Access to a user account with sudo privileges.
- Apache installed on Ubuntu 18.04/20.04/22.04 LTS.
Step 1 : Creating a Password File
Before we can set up password authentication, we need to create a password file that Apache can refer to when a user attempts to access a restricted resource.
We will use the htpasswd utility to create this file. This utility can create encrypted passwords, which we will store in the file.
To create the file and begin adding users, type:
$ sudo htpasswd -c /etc/apache2/.htpasswd <username>You will be prompted for a password for the user. Enter a secure password, and confirm it. The -c flag tells the utility that this is the first user we are creating in the file.
For subsequent users, you can leave out the -c flag. This will add the user to the existing file instead of overwriting it:
$ sudo htpasswd /etc/apache2/.htpasswd <username>When you are finished adding users, you can verify the content of the file by typing:
$ cat /etc/apache2/.htpasswdStep 2 : Configuring Apache
Now that we have created the password file, we can configure Apache to refer to it.
We can do this by editing the configuration file of the directory that we are restricting access to. This can be the root directory of the server, or a subdirectory.
For example, if we wanted to restrict access to the root directory, we would edit the following file:
$ sudo nano /etc/apache2/sites-enabled/000-default.confIf we wanted to restrict access to a subdirectory, we would edit the corresponding file within the sites-enabled directory.
We need to add the following configuration block to the file. This block should be placed between the tags that refer to the directory we are restricting access to:
<Directory /var/www/html>
    AuthType Basic
    AuthName "Restricted Content"
    AuthUserFile /etc/apache2/.htpasswd
    Require valid-user
</Directory>
The AuthType directive tells Apache what type of authentication we are using. In this case, we are using basic authentication.
The AuthName directive provides a name for the authentication realm. This will be displayed in the authentication dialogue presented to the user.
The AuthUserFile directive tells Apache where to look for the user credentials. In this case, we are using the file we created in Step 1.
The last directive, require valid-user, tells Apache that the user must provide valid credentials to access the restricted resource.
When you are finished, save and close the file.
Step 3 : Restart Apache
Now that we have configured Apache to refer to our password file, we need to restart the server to enable the changes.
We can do this by typing:
$ sudo systemctl restart apache2Conclusion
At this point, Apache should be configured to require valid credentials for access to the specified directory. When a user attempts to access the directory, they should see a prompt like this:
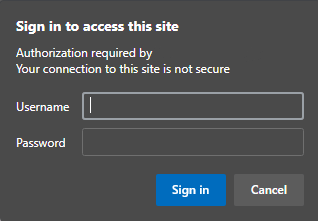
If the user enters valid credentials, they will be granted access. Otherwise, they will see an error message.